


Live in a rental but want a light future that’s meant to be hardwired? No problem. Live in a home where you thought you could use a plug-in light, but there are no outlets around? No problem either!
GET THE LOOK


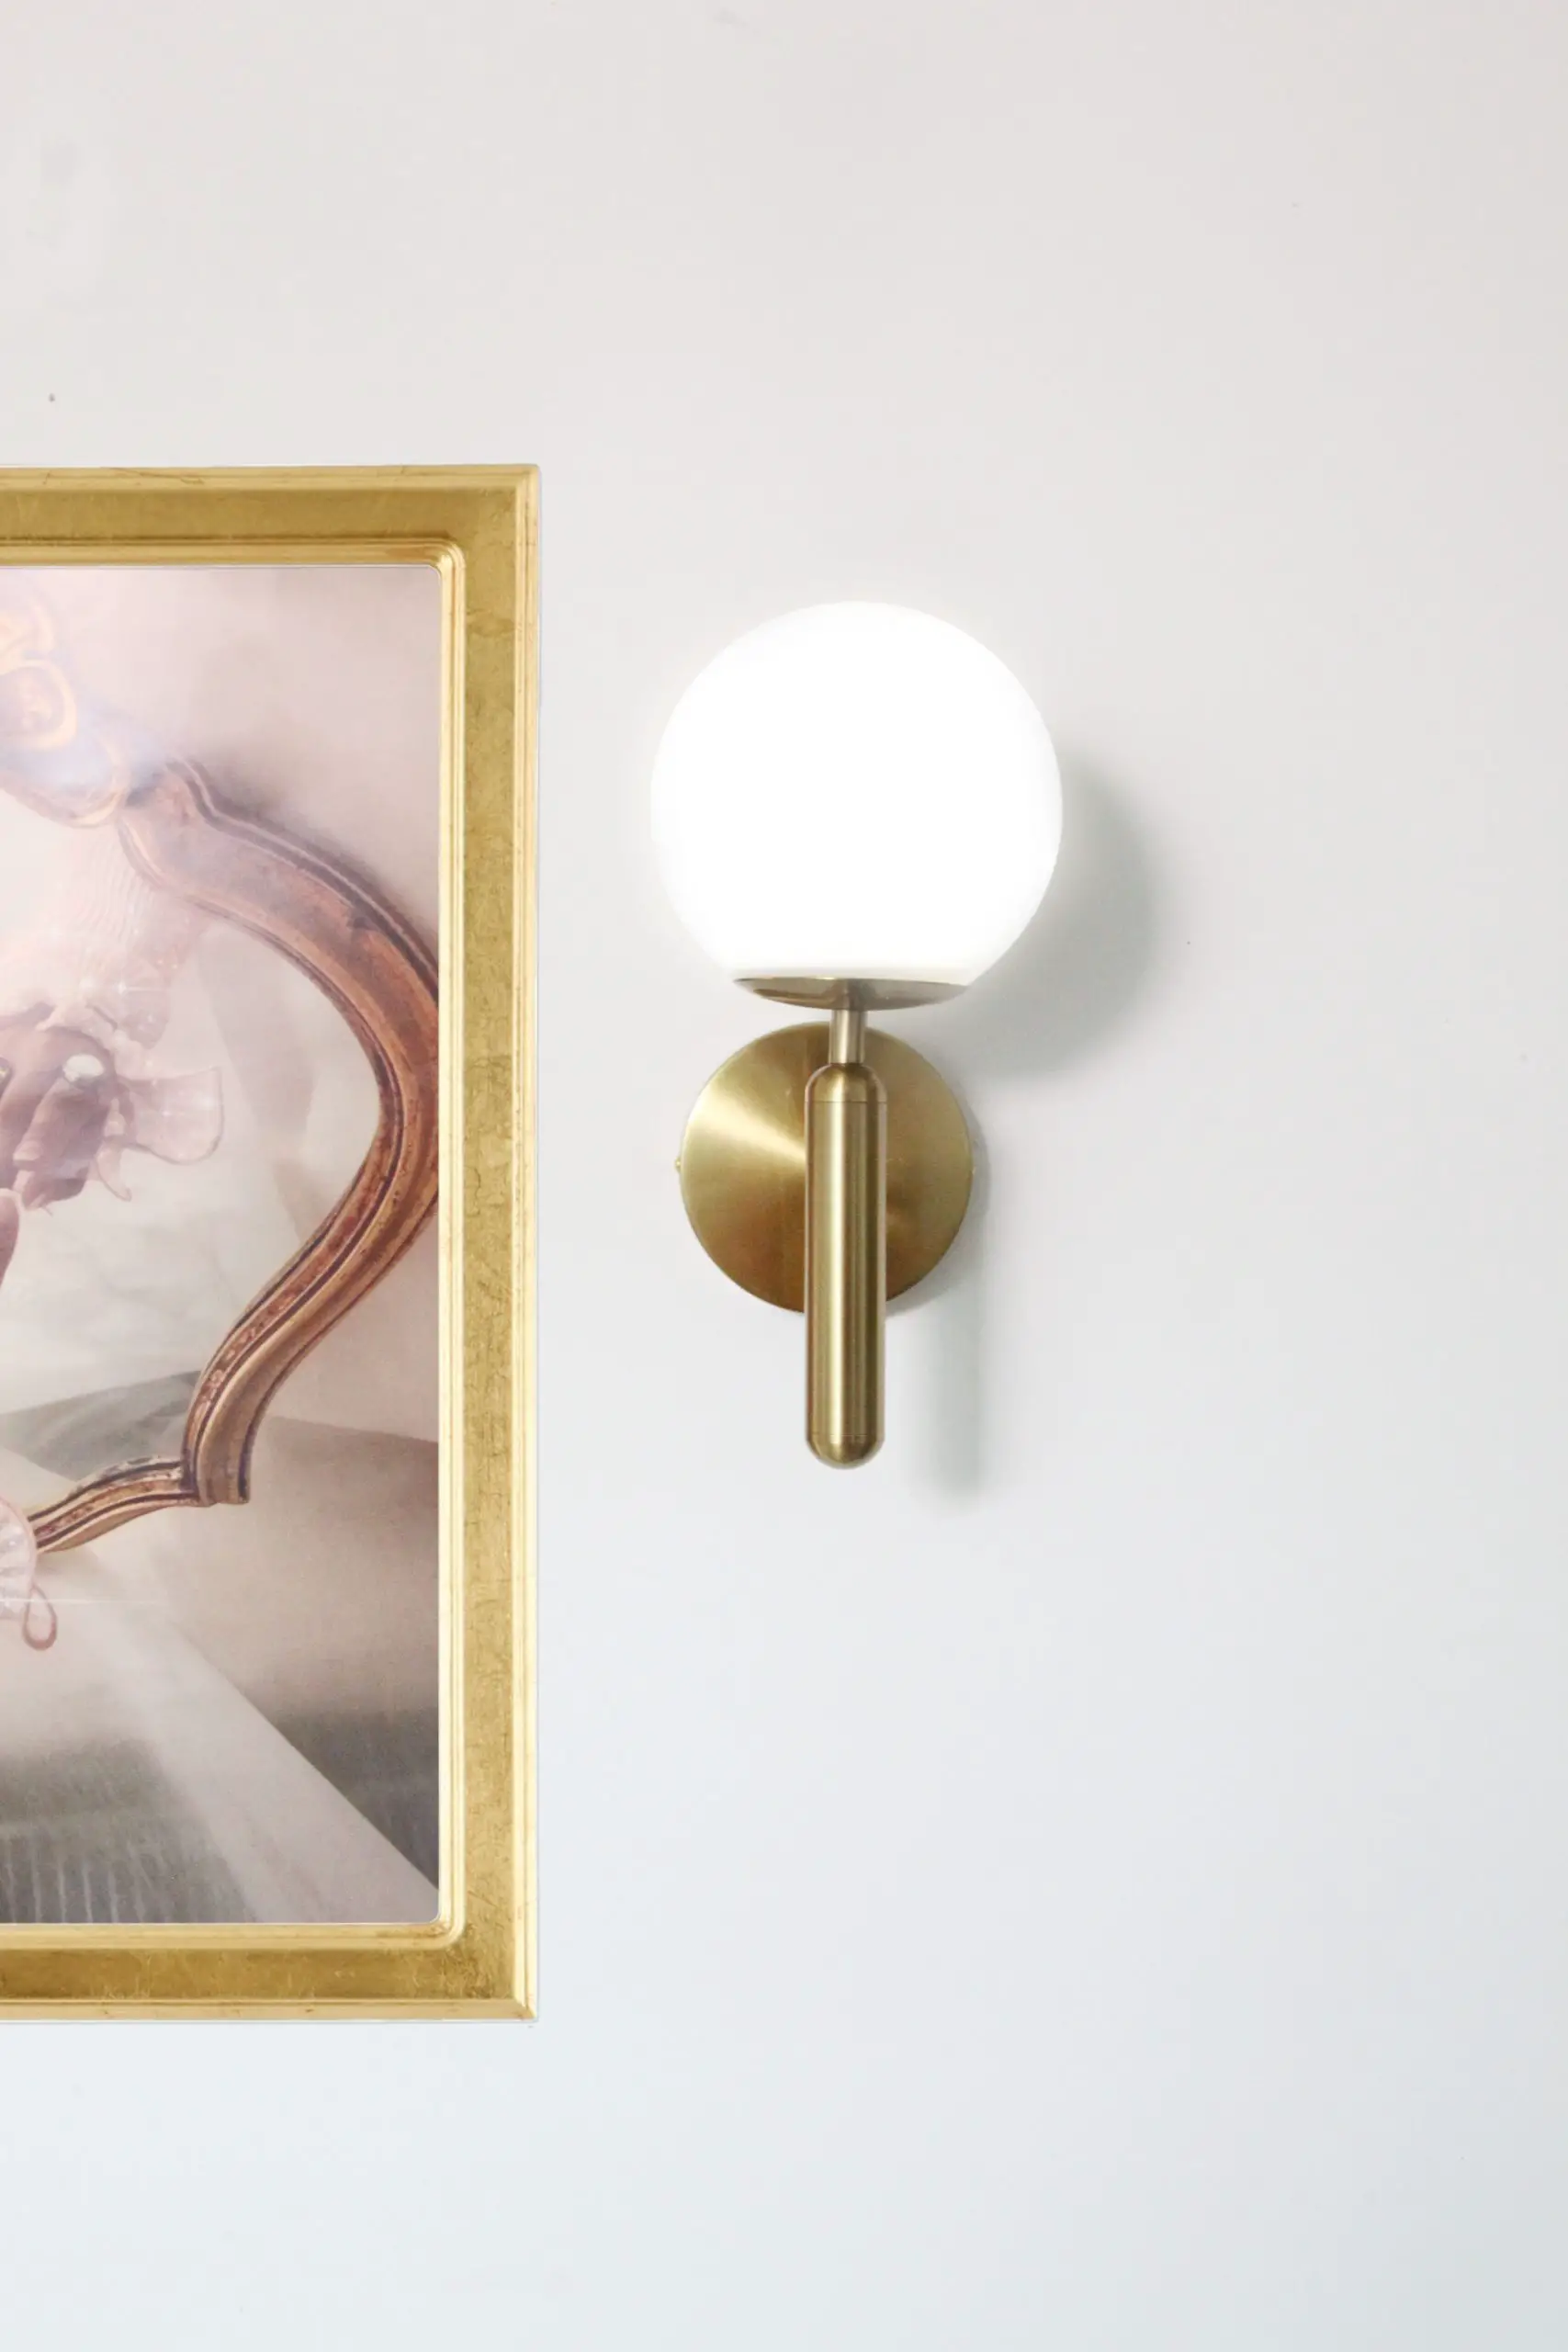
Today, I am showing you how you can install the wall light of your DREAMS without needing an outlet nearby OR the ability to hardwire! You heard me, a wall light without electricity! *shocks*

These are the items that you will need:
- The sconce or light of your choosing (I recommend choosing something opaque where you won’t be able to see the puck light)
- The hardware that comes with your sconce (you will assemble and hang the light with the exact directions that come with your specific light) Most sconces come with an anchor and screws!
- A screwdriver (this is only if you need to disassemble your shade like I had to, to get the pucks to fit inside!)
- 4-6 light pucks! (
I used two in eachI actually took one out because of weight. These lights will go inside your light fixture) MAKE SURE TO PURCHASE PUCK LIGHTS WITH A REMOTE! If you don’t purchase with the remote, this won’t work!
The key to this DIY is using battery-operated PUCK lights instead of bulbs or battery-operated bulbs. I repeat- do NOT use a battery-operated bulb for this! LED bulbs will only last 3 hours on battery versus puck lights which can last a good 2-3 months.
So, I ended up choosing a sconce that I had to take apart to be able to fit the pucks in. I’m sure you can find larger lamps that don’t require this, however, I loved these lights and knew I had to have them!
The DOWNSIDE of this tutorial (there are always downsides to hacking the system LOL!) is that once the batteries die, I will need to unscrew the lamp to replace the batteries in the puck and reassemble the lamp. I do think this is a fair trade-off for having killer lights in your home with NO electricity required!

1. IF you need to, disassemble your shade so the puck lights are able to fit inside.
2. Make sure there are batteries in your puck lights (most don’t come with batteries)

3. Place the puck light inside of your shade. If you have a shade that’s not round, you can use a 3M strip to attach the puck to where the bulb socket is.

I had to screw the lamp onto the base after placing the puck inside.

4. Assemble the light based on the instructions the manufacturer was given to you. NOTHING changes about the way you mount your light except for the fact it doesn’t need to be plugged in or hardwired!

My light required me to use anchors in the wall, which wasn’t a problem since they were small. This entire process to about 30 minutes and I think the end result looks amazing! It truly looks like it was hard-wired into the wall. All you need to do is use the remote to turn the light on and off. Brilliant, if I do say so myself!!
The puck lights I bought are dimmable and are sooo bright (fancy!). I will link all the products I used below 🙂
GET THE LOOK
Will you be trying this out in your own home? Let me know down below!


I love this! can you link the sconces you used? it looks like it redirects to the screwdriver
Will fox right away!! Thanks!
I love your sconces! Where did you get them!! I’m going to follow your lead!!
links are in the post! 🙂
Hello
LOVE LOVE LOVE your apartment decor and DIY ideas!
Do you have any recommendations (e. g. product brand name, website, etc.) for recess lighting on the ceiling for a rental space similar to your puck in sconces presentation? I would like to create a faux recess lighting on my ceiling without the hardwire of recess lighting.
Thank you
Hi! I love this idea! Wear did you get this scone and the puck lights?
all linked in the post 🙂
GENIUS
Don’t do this. I was so excited, and this is just the worst. I bought the same exact lamps and puck lights, but 1) the light is not very bright or soft to fill a room for evening reading 2) what is notably excluded in this is that when you put 2-3 puck lights in there, you can see circles of shadow from the puck lights and you’re best best is shaking the lamp to get the puck lights positioned right, but then that doesn’t work when u have to place them on the wall. and because these scones are round…you can’t stick them onto the globe on the inside. Which would be hard to remove in 2-3 months anyway. Don’t waste your money like I did 🙁 maybe use a different sconce, but this DIY is not useful at all
Oh no! That makes me so sad! I placed my pick lights in the back so you can’t see the shape of them. Also, if you bought the same lights as me, you should easily be able to twist the top off to adjust the pucks. Hope this helps xo
I purchased what you recommended – the puck lights are way too big for this sconce, even when I unscrewed the cap from the shade. So disappointing! It might be a good idea to share measurements in the future.
Hi! Unfortunately, Amazon keeps replacing that puck light link every few weeks with a new product. I try to keep an eye out for product changes, however, I can’t monitor it 24/7.
Thank you so much for all of your tips and tricks! i was about to order these, but wanted to check and see how often you ended up needing to change the batteries in the puck lights?
thanks so much!
Hello Dear Sales,
Am Andrea Carriere, From Mount Wachusett Community College.
I am requesting for the quotation of the materials below if you can supply us any of these items below.
Please provide us with the quoting of your best price for the below mentioned product(s).
2X2 LED Flat Panel Light 5000K 40W AC100-277V Dimmable DLC Listed, Backlit Ceiling Light For Office & Conference Meeting Room, Hospital, School, Retail Stores (Case of 2)
Fluorescent White PANEL 40W 2X2′
Case Pack: 2 pcs
Quantity needed: 2000 pieces
Your quotation must be valid for at least 30 days and our company’s payment terms are Net30 days from the date of your invoice with our official company’s purchase order. Since there is probably specific information that you require before establishing a credit account with us, perhaps it will make more sense for you to send us the paper works to be filled out.
I look forward to hearing from you.
Andrea Carriere
Departemen penjualan
7609999788
100 Erdman Way
Leominster, MA, 01453-1804
Amerika Serikat
United States
studentservices@mwcc.us